
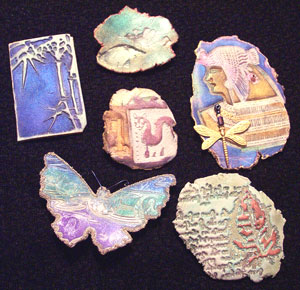
Posh Paperclayź Pins
Designer - Karen Nicholson of Albany, NYMaterials:
- Creative Paperclayź modeling material
- Plastic wrap or waxed paper
- Rolling pin
- Rubber stamps or other objects
- Plastic knife or x-acto knife
- Pearl-Ex powders
- Paint brush
- Metallic pens
- Optional: black ink pad
- Optional: beads, charms, etc.
- Acrylic sealer
- Pin back
Procedure:
- On a clean flat surface, roll out Paperclayź between two layers of waxed paper or plastic wrap, to a thickness of approximately 1/8 inch. Remove the top layer.
- Press rubber stamps, natural objects, or other items into the Paperclayź to make a design. Cut or tear the edges of the clay around the design.
- If desired, gently rub a black inkpad over the top of the Paperclayź. The recessed designs will stay white.
- Using a small, dry paint brush, brush various Pearl-Ex powders onto the Paperclayź. Interference colors will show up best on the black ink. Opaque colors will show up on black or white areas.
- Allow the piece to dry overnight.
- If desired, highlight parts of the design or the edges of the piece with metallic pen, and attach beads, charms or other embellishments.
- Spray the finished piece with acrylic sealer.
- Attach pin to the back.