
Magical Mosaics
Submitted by Designer Sandie Wiese of South DakotaObjectives:
The students will create their own original and unique Creative Paperclay® mosaics incorporating the art skills and concepts of color, shape, design and pattern.
Introduction:
This lesson is for second grade and above. You will need 2 art class periods to complete.
Materials:
- Creative Paperclay® modeling material
- Clear disposable plastic dessert plate for each student
- Watercolor paint sets and brushes
- Acrylic paint - black
- Acrylic varnish - satin finish
- Rolling pin
- Ruler
- Sharp non-serrated knife
- Oven - preheated to 250 degrees
- Non-stick baking sheet
- Sandpaper
- Fiskars Paper Edgers scissors
* Prior to doing this project with your students, YOU will need to create and complete a Paperclay® Mosaic of your own to display for them! You will also need to have a class sized supply of mosaic tiles pre-cut and baked.
Lesson Activity:
Day 1 -
Using the books about mosaic artwork, show the students illustrations and photos. Discuss the various sizes, shapes, designs, patterns, and colors within the mosaics. Show the students your Paperclay® Mosaics. Discuss and demonstrate the process which you used to create the mosaic tiles:
- Using rolling pin, roll the Paperclay® out to an even thickness of 1/8".
- Demonstrate using the ruler to mark off the measurement increments for cutting the tiles out.
- Holding the ruler firmly, use the knife to slice along the ruler’s edge vertically and then repeat the procedure horizontally.
Discuss how you then baked the pre-cut tiles, and what changes occurred in the Paperclay® as a result of the baking; weight, flexibility, texture, hardness, color, etc. Show how you sanded the tiles’ edges.
Demonstrate using watercolors to paint the tiles, and discuss the effects of adding a coat of Satin varnish to dried painted tiles. Instruct the students to sand, paint and varnish their pre-baked mosaic tiles.
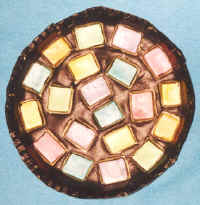
Demonstrate using a rolling pin to roll Paperclay® out into an even thickness of 3/16". Show students how to gently place inverted plastic plate onto rolled out Paperclay and press down along edges to mark plate area. Remove plate, and using Fiskar Paper Edgers scissors, cut Paperclay® circle out along marked edges. Gently press cut out circle of Paperclay® into plastic plate, applying pressure to conform to fit the plate’s shape.
Demonstrate creating a mosaic design by placing completed tiles within the flat surface of the Paperclay® covered plate. Push each tile firmly with an even amount of pressure into the Paperclay® plate until the Paperclay® fills in around the tile.
Assist the students in creating their plates as listed in steps #4 - #6.
Let plate air dry until next Art class period. The Paperclay® plate will shrink during the air drying process, allowing you to remove the entire shape, and invert for even drying.
Day 2 -
1. Display the air-dried Paperclay® Mosaic plates. Discuss the changes that have occurred due to the drying of the Paperclay®.
2. Instruct the students to use black acrylic paint to paint their Paperclay® plate surface around the tiles. When the front of plate has been painted and dried, the underside may be painted.
3. The paint will dry quickly, and the students may then varnish the entire Paperclay® plate surface, tiles included. When the front of plate surface has been painted and dried, the underside should be varnished. Let dry. Display.