
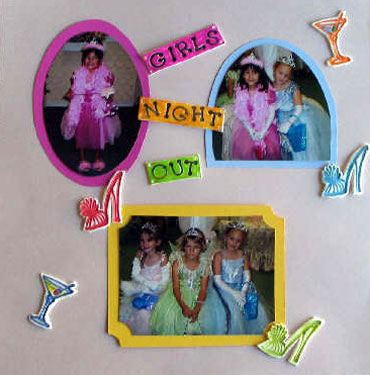
Girls Night Out Scrapbook Project
Materials:
- Delight™ air dry modeling compound 3.17 oz. (UPC 737092004110)
- Your Photos
- *Rubber Stamps by Vap! Scrap – Shoe (UPC 729632003189) and Martini Glass (UPC 729632003189)
- Inkadinkado® Dot Alphabet Rubber Stamp Set (UPC 725718259761)
- Stamp Ink (Ranger Archival Ink)
- Cardstock Pieces by Paper Reflections (UPC 609636038793)
- Provo Craft 12” x 12” Scrap Pads
- ***Marvy Craft Punch (optional for extra embellishment)
- ***Stencil template (optional to cut photos and cardstock)
- Scissors
- Scotch® Photo and Document Double Sided Tape
- Q-Tips
Procedure:
1. Choose your photos and 12” x 12” Scrap Pad
2. Cut out photos out in desired shapes, cut out corresponding cardstock pieces in the same shape and approximately ¼” larger around the edges to provide the photo border. A stencil template for cutting is not necessary, but can be helpful.
3. Tape the cutout photo on the center of the cutout cardstock with your two-sided tape.
4. Open the package of Delight™ air-dry modeling compound. Break off a piece of the Delight and roll it between your hands to approximately the size of a golf ball. Be sure to keep unused portion of Delight™ sealed in a Ziploc® plastic storage bag so it can be used later and doesn’t dry out.
5. Place the ball of Delight™ between two sheets of wax paper and flatten it with a hard cover book or the back of a large wooden rubber stamp until it is about 1/8” to 3/16” thick. Repeat as needed so you have enough flattened compound for all the rubber stamp images you want to do.
6. Peel off top sheet of wax paper to expose the flattened Delight™. Using the rubber stamps and Ranger Archival Ink of your choice, gently stamp your inked stamp onto the flattened Delight™.
7. Carefully cut the Delight™ around the stamped image taking care not to smear the fresh ink
8. Let the stamped image dry for a few hours.
9. Color your semi-dry Delight™ stamped images as desired with paint, markers or stamp ink. Q-tips can be used to daub on soft highlights.
10. After coloring highlights, allow Delight™ stamped images to dry completely for at least 24 hours. Turn the pieces over occasionally to be sure that both sides of the modeling compound dry evenly. This will help minimize any warping that may occur.
11. When Delight™ stamped images are completely dry, tape as desired to your scrapbook page.
Helpful hints when working with Delight™ air dry modeling compound
Scissors can be used to cut the Delight™, but an X-acto knife or blade may work better for small detailed cutting.
When drying flat pieces of Delight™, allow the pieces to partially dry, then put a flat object on top as the drying completes to minimize warping.
When working with Delight™ air dry modeling compound, be sure to have clean hands and a clean work area. Delight™ tends to pick up dirt, lint, hair, etc. and it is especially visible with the white compound.
Be sure to keep unused portion of Delight™ sealed in a Ziploc® plastic storage bag so it can be used later and doesn’t dry out.
Krylon Make It Acid Free spray can be used if needed for scrapbooks.