
Positively Paperclay - Lesson Plan
Submitted by Designer Sandie Wiese of South DakotaObjectives:
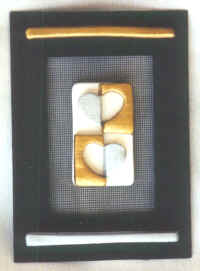
The students will create their own original and unique positive - negative shape plaque incorporating the art skills and concepts of positive and negative cut out shapes, space, counter-changing shapes and colors, balance, texture, and composition.Introduction:
This lesson is for fourth grade and above. You will need 2 art class periods to complete.
Materials:
- Creative Paperclay® modeling material
- Heart shaped plastic or metal cookie cutter
- Metallic gold and silver acrylic paints/brushes
- Black mat board frame
- Black nylon window screen material
- Rolling pin
- Metal ruler or straight edge
- Low temp/cool melt glue gun
- Water filled container
- Paper towels
- Wire cookie rack, or other “ventilated” surface (for air drying method)
- Sandpaper (very fine/extra fine)
- Scissors
- Soda can top tab (for hanger)
- Non-stick baking sheet (if using bake method)
- Oven-preheated to 250 degrees (if using bake method)
Lesson Activity:
Day 1 -
1. Working on a smooth clean work surface, use rolling pin to evenly flatten desired amount of Creative Paperclay® modeling material to an approximately ¼” thick slab. Rolling it out between two sheets of waxed paper is helpful.
2. Remove the top sheet of waxed paper. Gently, with evenly distributed pressure, push the cookie cutter all the way into the rolled out slab.
3. Leaving the cutter in place. Use the long sharp edge of the ruler to mark off and cut out an even square area surrounding the cookie cutter design.
4. Remove the excess Creative Paperclay® material from around the square, as well as from the cookie cutter. Store the excess in a Zip Lock® bag for future use.
5. Use the long sharp edge of the ruler to cut the remaining design in half vertically.
6. Roll out another larger ¼” thick piece of the Creative Paperclay® into a slab.
7. Gently lift up the resulting four design pieces individually from the work surface.
8. Moisten the underside of each design piece using your finger to apply a thin layer of water. Gently, but with a bit of pressure, arrange the moistened design pieces onto the newly rolled slab.
9. Use the straight edged ruler to mark off and cut out around the completed design, forming the composition into a rectangular plaque.
10. Dry:
To use the “air dry” method, place the plaque onto a wire cookie rack for one or two days until it dries and hardens. After it’s dry, it will be lighter in color and weight than when it’s moist.
To use the “bake” method, place the plaque onto a non-stick-baking sheet, and put into oven preheated at 250 degrees. Bake for approximately 40 minutes, turning design pieces over to other side partway through the baking time. Remove carefully from oven and let cool.
Day 2
11. Use small folded pieces of sandpaper to sand away any rough edges.
12. Paint with acrylic metallic paints. Let dry.
13. Cut nylon screen rectangle to fill the inside of the mat frame.
14. Drizzle melted glue around the edges of the reverse side of the mat frame, and carefully place the edges of the screen rectangle onto the glue. Pull edges to make taut and even. Let bond.
15. Drizzle melted glue onto the back of the painted plaque, then press the plaque glue side down onto the front center of the screened mat.Glue the soda tab on the back of the mat for a hanger.