
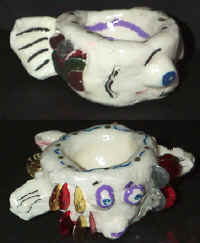
Fish Mugs
Submitted by Michael Gettings
Chesterfield County Public Schools, Chesterfield VirginiaIntroduction: This lesson is designed to integrate and reinforce classroom curriculum objectives with art the curriculum. Students will study basic fish anatomy. They will create a "fish mug" using Creative Paperclayź modeling material and basic hand building techniques. Lesson activity takes 2 to 3 forty-five minute class periods.
Note:Mugs are only decorative and not designed to hold water or be washed.
Show visuals of fish. Ask students to tell you the different parts of the fish (Eyes, mouth, gills, scales, fins). Ask students to tell you what they know or have learned about fish (Where do they live? What do they eat? How big are they? There are countless questions that can be used to direct the students).
Demonstrate the activity in its entirety in front of the students before completing the step-by-step process.
- Pinch a small ball (about golf ball size) of Creative Paperclayź and roll it into a ball.
- Hold the ball in the palm of one hand and using the thumb of the other press into the ball.
- Squeeze with the fingers while turning the ball Repeat until a small pot is formed.
- Gently tap it on the wax paper to flatten the bottom Roll 3 little balls.
- Gently scratch ("score") the pot where you want the eyes to be placed.
- Dip finger into water and dampen the scored spot and the area of the eye that will be placed against the pot.
- Press the eye then gently wiggle back and forth.
- Use the pointed stick to smooth the eye on the pot. Fingers can be used too.
- Place the second eye, mouth, and fins using the above technique.
- Use the stick to poke eyes, scratch the gills and name on the bottom.
- Take spangles and press them into the sides of the pot. Be sure they overlap. Allow pot to dry for 2 to 3 days (If you are in a hurry, you may dry them in the oven at a low temperature).
- Using markers or paint, add lines and color to the mugs.
- Put a thin coat of a gloss medium like Mod Podge on mug. Allow it to dry, then add another thin coat.
Conclusions: This lesson is appropriate for grades 1-3. I don't call them pinch pots until after the lesson; otherwise too much pinching takes place and the pot walls are too thin. The trick is to get the students to gently squeeze then turn, squeeze them turn - if they do too much in the beginning, then the pot will be too shallow or the sides will be too thin. They can use a little bit of water to smooth out cracks. Place the unfinished projects in plastic grocery bags to keep the clay workable. Place unused Creative Paperclayź in Ziploc Bags to keep it fresh. The end product is a cute piece of work that the students are very proud of. The use of the Paperclayź modeling material enables the project to be completed with very little special or expensive equipment. A brief lesson into the origins of the material is beneficial for the students too.